Paper Clips

FAQ JobTrack

JobTrack

How do I send out event invitations?

Top
https://aspc.jobtrack.com.au/docs/web/st/help/Inventation.jpg?max-width=600&max-height=600
https://aspc.jobtrack.com.au/docs/web/images/avatar/liam.JPG
January 16, 2014

How do I send out event invitations?

Sending an event invitations to your contacts is easy

Create a new event.

Event

Invite your contacts by selecting the tab 'Invite Others'

Invite Others


Send the invitation via email 

Press the button "Send Invitation" to create an email populated with your contacts.

The email opens up with a pre defined template that can be changed.

email screen


Sample invitation

Your contact will receive an email that contains the options to accept your invitation or reject it.

 Email

When the recipient presses "accept" or "reject" links on your invitation, the system will update the the attendee confirmation status. 

The recipient will be shown the response page below, which can be customized as normal in the CMS module (public site)

Reply 

Tags: how-to

Getting Started

What is the new Calendar?

Top
https://aspc.jobtrack.com.au/docs/web/images/calendar_month_view.png?max-width=600&max-height=600
https://aspc.jobtrack.com.au/docs/web/images/avatar/IMG_6627.jpg
February 18, 2014

What is the new Calendar?

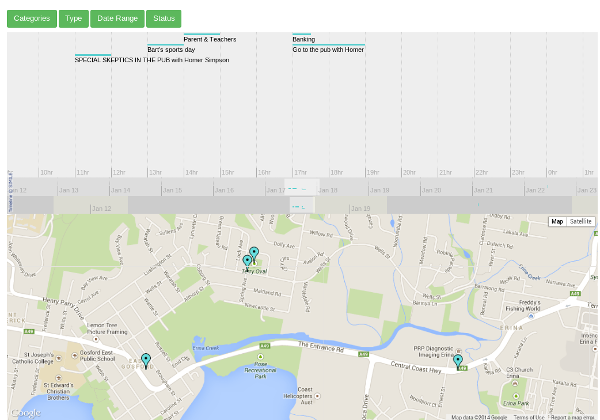
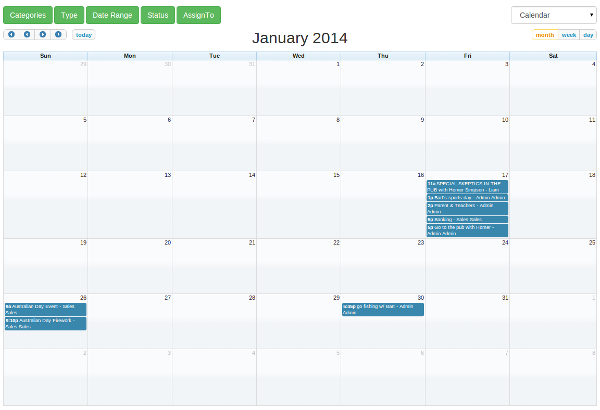
The new Calendar shows event, tasks, jobs and sales opps in the same screen

The new Calendar is a full-sized, drag & drop calendar. It uses AJAX to fetch events on-the-fly for each month/week/day.

Select from the filters to change the date range and items displayed according to type, category, status and assign to. Items are tasks, events, sales opportunities or jobs which have been entered and scheduled to a day and time. You'll see items in the calendar. Click on the item to see the details of the item. You can switch between the calendar and timeline view any time.

We've listed some handy Calendar Tips at the end of this post so read to the end!

Let's go through all the features:

Calendar and Timeline can be switched easily

 Mode Switch

Drag & drop or resize!

You can drag & drop an item to change its start time, or drag to resize and change it's duration when you're in the week/day view.

There are 3 views: month, week and day.

Month View;

Month View

 Week View;

Week View


 Day View;

Day View


You can quickly jump to previews or next year/month using the arrows and click on the Today button to jump back to today.

Buttons


Calendar has 5 filters;

  • Categories
  • Type
  • Date Range
  • Status
  • Assign To

Categories Filter;

Select multiple Categories to filter your events, tasks, sales opps or jobs.

Categories filter

Type Filter;

Select multiple Types to show events, tasks, sales opps or jobs.

Type filter

Date Range;

Select one of the Date Ranges to display that range of dates in the Calendar.

Date Filter

Status Filter;

Select to show All, Open or Closed items. Or select one or more task status to show

Status Filter


Assign To Filter;

Select to show items assigned to one or more persons.

Assign To Filter


Some events, tasks, jobs or sales opps doesn't have a start time, these items are shown below the calendar.

Other Events

Calendar Tips! Try these out;

  • Click a day to create an event on this day
  • Click at particular time in week/day view to create an event at that time
  • Drag & Drop an item to change the start date, you even can choose the time in week/day view
  • Drag the bottom line of an item in week/day view to resize the item
  • You can always press "ESC" key to close a filter pop up

Take a free trial and try out the new Calendar, experiment with showing only a small number of filters and then add filters. Enjoy this new module and send us your feedback

Demonstration

How do you change the welcome page?

Top
https://aspc.jobtrack.com.au/docs/web/images/avatar/liam.JPG
March 11, 2013

How do you change the welcome page?

You can change the Welcome page in your application to keep your corporate look and feel and branding.


  • Click the [CRM] Button in the left navigation menu
  • Click the [Sites] Button in the left navigation menu
  • Click to open the [public] site

 Select public site

  • Click the [Pages] tab
  • Click the[Welcome] page

Select Welcome page 

  • Click the [Script] tab to update the JavaScript if needed
  • Click the [Style] tab to update the style sheet if needed
  • Click the[welcome component] to edit the page

Welcome component 


  • Design your Welcome page
  • Save your changes 
  • Click the[Publish] button in the site screen

Design the Welcome page


Tags: designer

Advanced text searching on any record or document

Top
https://aspc.jobtrack.com.au/docs/web/st/development/document-search.png?max-width=600&max-height=600
https://aspc.jobtrack.com.au/docs/web/images/avatar/liam.JPG
March 13, 2013

Advanced text searching on any record or document

Keyword search on reports means it is easy to search for a word across multiple fields.

Overview

A class can have many fields included in the key word search from the current record or related records.

Keyword searches give a powerful search facility in a single "Google" style search box. A convenient and simple search box can be used instead of the more advanced search screen in many cases.

The keyword index uses the Soundex algorithm to create the unique set of words, this allows for direct index searches on either the actual words or the words that sound like those entered.

Search Operators

Search for an exact phrase

"search phrase"

Use quotes to search for an exact set of words. Only use this if you're looking for an exact phrase, otherwise you'll exclude many helpful results by mistake.

"fun in the sun"

Exclude a word

-search

Add a dash (-) before a word or site to exclude all results that include that word. This is especially useful for words with multiple meanings, like Jaguar the car brand and jaguar the animal.

jaguar speed -car


Fill in the blank

*

Add an asterisk within a search as a place holder for any unknown or wild card terms. Use with quotation marks to find variations of that exact phrase or to remember words in the middle of a phrase.

"a * saved is a * earned"

Search a set of words

word

Will return any record that begins with the keyword and it is not case sensitive, for example fun will match; "function" "fun" "Fun" "having fun" "That is funny". fun would not match "malfunction" "notfun"

How to use

You will find the Keyword Search fields at the top of the report screen.

Report keywords search

Enter a keyword and click the search icon (magnifying glass) or press enter, the search result will show all the records with matching values in any of the listed fields.

Tags: search

How does group contact categories work?

Top
https://aspc.jobtrack.com.au/docs/web/st/categories.jpeg?max-width=600&max-height=600
https://aspc.jobtrack.com.au/docs/web/images/avatar/liam.JPG
April 18, 2013

How does group contact categories work?

Easily categorize all your contacts

How does it work: 

In the example below, by selecting the parent category called 'Group 1' , all the sub categories 'Finance,Other,Supplier' are selected automatically.

Or we can only select the sub category (Like the category 'Marketing' In the example below)

Edit screen


Search for contact by category

Search screen


 How to group categories:

Go to Admin and open the 'pick list manger' and select the table called  'Contact Category', this table holds the list of categories.

Create new category like 'Group 1', this category will be the parent group.

Find the child category and set the parent category ('Group 1' in the example )

Contact Category


What is the new Timeline module?

Top
https://aspc.jobtrack.com.au/docs/web/Timeline.png?max-width=600&max-height=600
https://aspc.jobtrack.com.au/docs/web/images/avatar/Tina_20101.jpg
January 23, 2014

What is the new Timeline module?

The Timeline module is a clever combination of sliding graphs and map to visualise your events, tasks or sales opps.

Timeline is more than a graphical representation of your JobTrack data, it is interactive allowing you to link back to the item with a click to see the full details, edit and add details.

Select from the filters to change the date range and items displayed according to type, category and status. Items are tasks, events or sales opportunities which have been entered and scheduled to a day and time. You'll see items in timeline bands with a colour line representing their scheduled time and duration. The items you can view on the timeline bands are displayed on the Google map by markers. Click on the item in the timeline band to see a summary above the marker which is also a link to the item. Click on the item summary link to open the item. You can also click on any marker on the map to see the item summary.

There are 3 Timeline Bands;

Hours, Days, Months.

Timeline Bands

Timeline has 5 filters;
  • Categories
  • Type
  • Date Range
  • Status
  • Assign To
Categories Filter;

Select multiple Categories to filter your events, tasks, sales opportunities or jobs.

Timeline Categories Filter

Type Filter;

Select multiple Types to show events, tasks, sales opportunities or jobs.

Timeline Type Filter

Date Range;

Select one of the Date Ranges to display that range of dates in the Timeline.

Timeline Date Filter

Status Filter;

Select to show All, Open or Closed items. Or select one or more task status to show

Timeline Status Filter


Assign To Filter;

Select to show items assigned to one or more persons.

Timeline Assign To Filter


Timeline Tips! Try these out;
  • In the Google map, double click the left mouse button to zoom in, double click the right mouse button to zoom out
  • In the Categories, Type and Date Range popup, you can use Esc (on the keyboard) hot key to close the popup
  • In the Categories selection, hold Ctrl key to select or un-select items, hold Shift key to select a set of items
  • Double click the Timeline Band to jump to that date/time (this is my favourite tip!)
  • Scroll the mouse wheel to move the time forward/backward when the mouse is hovered over a Timeline Band

Take a free trial and try out the Timeline module, experiment with showing only a small number of filters and then add filters. Enjoy this new module and send us your feedback

Demonstration

Calendar

How can stSoftware's CMS be used to manage events and resources?

Top
https://aspc.jobtrack.com.au/docs/web/st/development/new-year03.png?max-width=600&max-height=600
https://aspc.jobtrack.com.au/docs/web/images/default_avatar.png
March 13, 2014

How can stSoftware's CMS be used to manage events and resources?

Events and reasources are managed through multiple modules

Events and Resources are managed through multiple Modules.

They are briefly outlined here;

Events

  • Details, site, time and date, duration


  • Invite attendees – select attendees then click send invitation button to send template email to all attendees & record status and attendance


Scheduler

  • scheduling events - resources according to availability, skill set, location


Admin

  • manage staff resources – availability rules, specialisations and rates


Timeline

  • Easy graphical interface for tasks, events, jobs (projects)


Calendar

  • View events and create new events on the Calendar

Tags: event, Task

How to enable desktop notification?

Top
https://aspc.jobtrack.com.au/docs/web/news/Notification-Bell.png?max-width=600&max-height=600
https://aspc.jobtrack.com.au/docs/web/images/avatar/IMG_6627.jpg
November 11, 2015

How to enable desktop notification?

Chrome and Firefox allows native desktop alerts.

When you get a new desktop notification, your browser will ask for your permission to show the desktop notification by default.

Chrome:

Click the "Allow" button in the pop up


Firefox:

Select "Always Show Notifications"


You can always change the notification permissions for a site.

Chrome:

  1. go to Settings
  2. click the "Show advanced settings" link at bottom
  3. click the "Content settings" button in Privacy section
  4. scroll down to "Notification" section
  5. click the "Manage exceptions..." button


Firefox:

  1. Open the site you want to change the notification permission
  2. right click somewhere in a blank spot (or pressing Ctrl+I on Windows or Cmd+I on Mac) and select "View Page Info" from the context menu
  3. go to permissions tab, scroll down to the very bottom until you see "Show Notifications"


Supported Browsers

The web notification is supported by Firefox, Chrome, Safari and Opera very well, however, IE and edge don't support it. (Our notification will be shown in the top right corner of your browser if your browser doesn't support web notification or you don't give permission to show as desktop notification)

Tags: HTML5